Showing posts with label curtains. Show all posts

Sunday, August 19, 2012

Jamie and Josh's New Den


Last week I showed you the first part of Jamie and Josh's dining room/den swap and today I am so excited to show you the second part, because it's my favorite! For a little refresher you can click on this post and see what it looked like before when it was their dining room. Because they have a nice little seating area in their kitchen they didn't regularly use their dining room and thought it would be nice to move their den to the room off of the kitchen to help with the flow and making it so everyone could all hang out together more comfortably in the area of their home that they spend the most time in. I have to say I am a HUGE fan of the switch! 

The first thing they did was paint the walls a slightly lighter color, Cotswald AF-150, by Benjamin Moore, to help provide a little more contrast between the chocolate love seat and the walls.

Then they raised the chandelier (from Ballard Designs) seeing how the dining room table was no longer underneath it.

Pretty much everyone in our family has now fallen in LOVE with striped curtains. My sister Dana was the first one to go ahead and try painting her panels. She was looking for a fabric to make draperies for her new apartment in "the apple city" as Lillie calls it, and I suggested painting some panels. I had been wanting to try it in my master bedroom but admit I was a little scared to, but she was brave and gave it a try. She sent me a photo once they were up and I was completely wowed by how fabulous they looked and so I went ahead and made mine which you can see here including a photo of how I taped off the stripes. Jamie took on the biggest task, because she painted four panels! Dana and I were lucky and each just had to paint two. We all purchased our panels at IKEA and they were either $19.99 or $24.99 for a set of two panels. The rug and white slipcovered sofa in here are also from IKEA.


Fresh cut hydrangeas from their yard.


Josh made this coffee table for Jamie!


They still have two projects left in this room. First, Jamie is planning on painting the frames that she had in their other den ivory and hanging them on the blank wall. They are black right now and looked fine in the other room which had some black accents but will look better in a lighter color here. Once she gets that project done I will post some updated photos. The second project is finding a stand for their TV. I didn't even photograph that corner of the room (although the wall next to it is  two photos down) because it's currently sitting on a random way too tiny piece from my parent's basement. The piece it was on in their other den didn't fit in this space.

This is the wall to the left when you walk in. To the right of the chair on the right is where their TV is.


Jamie's kitchen is connected to the den. Here are a couple of photos so you can get the feel of it and you can find more here and here.
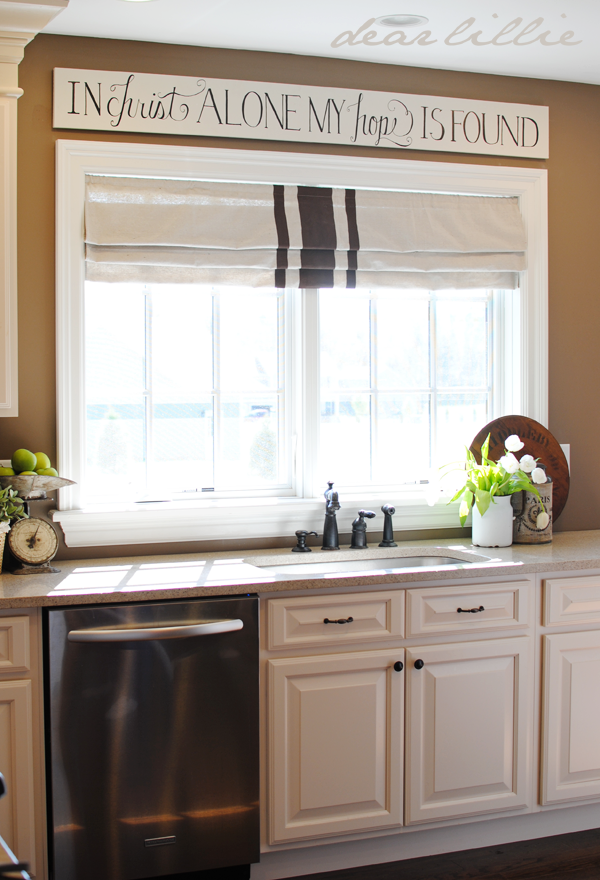
Jamie also made and painted this Roman shade last fall!


Also, I wanted to let you all know we now have our 12 by 20 give thanks pillow cover available in white!

Friday, February 17, 2012

Jamie and Josh's Painted Roman Shades and Breakfast Nook


I love this shot of the tulips that Jamie took!


Earlier this month Jamie made a new Roman Shades for her breakfast nook to match the one she made a couple of months ago for her kitchen. She made them out of a drop cloth and then just taped off the lines and then painted them in with some brown paint. I have to say when she first sent me a picture of them (back in November) I liked them but didn't love them. Then when we went up in December to visit I saw them in real life and LOVED them! It's funny how some things can look so much better in photographs than real life, and other things look so much better in real life than in photos. I actually think Jamie did a great job of photographing them (I took some photos back in December and wasn't happy at all with them) but still, I wish you all could see them in person because they are fabulous.


Also our "Love Is" 18x18 Pillow Cover Sets are back in stock!


And lastly, I wanted to thank you all for your e-mails and comments full of encouragement after yesterday's post. That meant so much to us. I hope you all have a wonderful Friday!

Monday, January 23, 2012

Painted Curtains and Pillows for the Master Bedroom

Well, I finally got my pictures uploaded of the curtains and pillows we painted a couple of weeks ago for our master bedroom. Believe it or not the white "curtains" we had hanging up there for the past three and a half years were just white twin sheets. I had them hanging like curtains so I don't think anyone knew, but it always drove me crazy. I never could find exactly what I was looking for, though, in my price range.

My sister, Dana recently moved and got a new job in New York and got to decorate a new apartment with her best friend, Christine. It turned out fabulous and I hope at some point I will be able to take some photos to share with you all. Anyway, when it came time to make some draperies she sent me a link to some fabric swatches that she was interested in but wasn't quite sure about. I agreed that although they were all pretty none of them were quite right for her space and suggested a stripe. I thought the bold look of a wide stripe would be a nice contrast to the otherwise soft room she was designing. It turned out finding a decently priced striped fabric that would look right in her apartment was not an easy task. I mentioned that I had seen on Pinterest some painted curtains but wasn't sure where. She found some links and decided to go ahead and give it a try. She bought two long white panels at IKEA and painted away. When she sent me a phone picture they were GORGEOUS! I fell in love with them and had her pick me up a pair of the same panels at IKEA and she sent them back down with Jason after Christmas. I used leftover paint from Lillie's room (London Fog by Benjamin Moore) and decided to go ahead and give it a try. I was in a hurry so I didn't bother to look up any tutorials but basically what I did was just used painters tape to tape off every 12 inches or so and then painted away. If you do want to find a full tutorial for this idea here is one from Shaunna at Perfectly Imperfect. I LOVE her blog!

I did two coats heavy coats (I didn't want the stripes to be see-through at all) and then ripped off the tape and that was it! It was pretty time consuming taping each panel off, but other than that it was really easy and I have to say I am so happy with them! And seeing how I used paint I already had they only cost me $24.99! (Or whatever the IKEA curtains were...I think it was $24.99, but I will check with Dana and make sure that is correct).
 I moved all my porch furniture aside to make room so I could lay each panel down. I had to do one at a time because of the space it took up. Oh how I wish we had a basement! =) 

After they were dry we pulled the tape off (Lillie loved that part!) and hung them.


I also played around with the pillows on our bed a little bit. First I brought back up the bolster pillow. It was in the garage after the girls did some damage to it =). I fixed it back up, though, and added a little panel with some new words on it that I was playing around with. We are hoping to have a bolster designed to sell soon. I also used the sheets that used to be our curtains to make pillow covers for our Euro shams on the back of the bed. You can see them below on the all white side that has a little ruffle in the center.


I made the Euro Shams reversable. On the other side I painted on thick strip down the middle using the same paint as the curtains. Once again, Lillie had lots of fun ripping off the tape once the paint was dry.


Here is one side of my extra sheets that were once curtains and now are pillows. 


And here is the other side:

Neither side is perfect but seeing how they go behind everything it doesn't really matter.

I didn't like mixing the gray stripes with the black on the other pillows so when I switched them to this side I removed the black pillows. I was a little torn on which look I liked better at first but now I am pretty sure I like this softer gray look better. What do you think?


While I was taking photos of our bedroom, Lillie made me these little Valentine's and wanted me to take pictures of them. =) 


And here is my little rascal doing a dance move on the trunk in front of the new curtains.

I also wanted to let you know that we have two new Valentine's pillows available in our shop today! Well, actually they don't need to be specifically Valetine's pillows. I have used the ones I made last year in Lola's room year round.


 And we also have a Ruffled Heart Pillow in White:


That's it for today! I hope you all have a wonderful Monday!


Releated Post