Chalkboard art is everywhere these days! I am completely fascinated by it and want to keep playing around with it and try to get more creative with my lettering. I know there are a lot of people though, that enjoy it but don't necessarily want to spend hours working on just one quote so being able to download a chalkboard someone else has designed, print it out and pop it in a frame is a great alternative - especially if you like to change your art our seasonally or for different holidays. We just started offering
our downloads a couple of weeks ago so only have a few options right now in
our shop, but we have several more that are almost ready to go and a whole bunch more ideas in the works. Hopefully within a few more months we will have a wide variety for you to choose from for a whole bunch of different themes and events.
Anyway, I've been promising to show you how I've been swapping out the chalkboard prints in this frame for the past week or two and finally was able to get it all written up last night so here it is!
Here is what you need for this project:1 24 by 36" chalkboard print
Painters Tape
4 pieces of wood for the frame ( to work with these prints I recommend using two 28" long pieces and two 33" long pieces)
1 large piece of wood (to work with these prints I recommend 24 inches by 36 inches)
chalkboard paint (optional)
stain (or paint) for frame
screwdriver
mending braces (I used 2" by 1/2" ones - there is a photo below of the exact ones I used)
screws (size 8 by 3/4 - I used a total of 6 - there is a photo below of the exact ones I used)
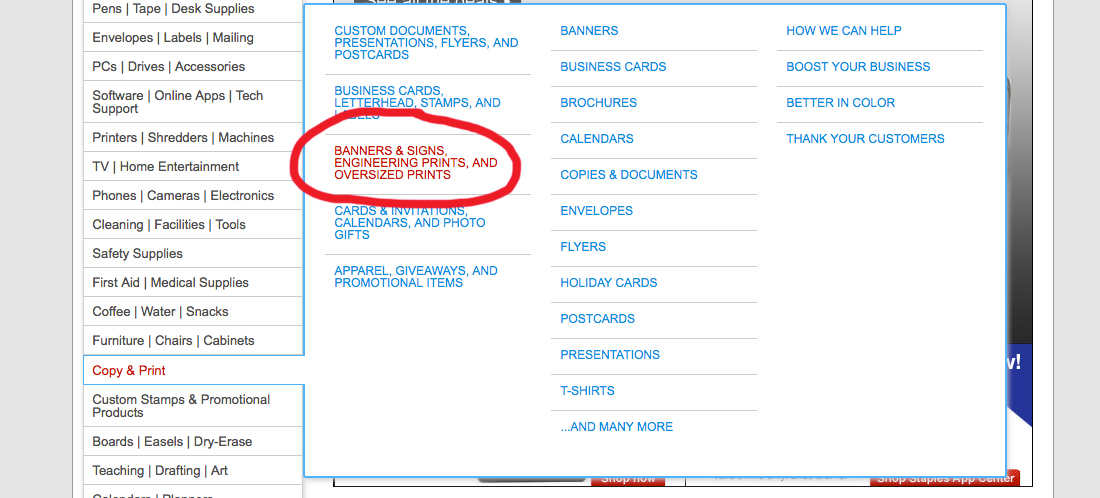
First, I am going to quickly show you how to upload the file online the Staples website. If you already know how to do that you can just scroll down and I will show the rest of the steps. We've gotten quite a few e-mails, though, asking how to do it so I thought it would be helpful to show step-by-step because it's hard explaining in an e-mail. I am sure there are other places that print engineering prints but I always use Staples. I actually don't use them for any of my other printed things, but for these engineering prints their price is great (a little over $3!) and it's easy to upload and then just go pick up the next day.So, when you get to their website look on the left sidebar and find "Copy and Print" and then choose "Banners & Signs, Engineering Prints, and Oversized Prints":
That will bring you here and click on "Engineering Prints":
Once you are there select the 24 by 36 size (if you forget it's okay you will be able to switch it later) and then click on "Design Now":
Now click "Add Files":
then click "upload files" and choose wherever it is you downloaded your PDF file too then just click on that file:
Once it shows up click on the upload button (this is one of our Easter ones that we hope to have ready to go early next week!):
Once it's loaded on the left side click Media and make sure you have the correct size and then click OK then click on orientation and make sure it's going the correct direction for the file you have uploaded. Then just add to cart and you are good to go! I always choose the option to "Pick up" vs. have it mailed to me and it will prompt you to choose the store nearest you. I didn't show those steps but they are easy enough to figure out.
Now that you have your print it's time to make your frame!
Here are my boards. I had them cut to size at Lowe's. I used 1 by 4's (which are actually about 3/4" by 3 1/2"). Make sure your board that is going to be for the chalkboard is slightly larger than the size of your frame opening.
The first thing I did was paint my board with my chalkboard paint. PLEASE NOTE: this is not necessary if you only plan on using chalkboard printouts in this frame. Even though I already had two other framed chalkboards when I was making the new one sized for the prints, I still went ahead and painted the board with chalkboard paint so I would have the option of using it as a regular chalkboard later if I wanted to.
While your paint is drying you can put your frame together. Here are the braces I used.
Just put the four pieces together and use the braces at each corner. I just used one on each corner (for a total of four) because I was doing it quickly. It was sturdier than I expected but if you wanted it to be extra secure I would recommend doing two braces on each corner for a total of eight.
Then either paint or stain your frame. I have made a few of these now and have stained two and painted two. So here is how it looks at this point (this is actually the first one I did not the most recent one as you can see from the Christmas tree in the background):
Now lay your frame down with the front side facing down:
Take your board and using painters tape (so that it can easily be removed without ripping the paper) start taping down the paper to the large board.
You can use as much or as little tape as you'd like. This is about how most of mine have looked:
Now flip it over and place it face down on the frame (I painted both sides of this board so I'd have more space to write new chalk art on):
Now it's time to attach the board. These are the screws I had on hand. There is probably something better you could use but they were the right size and they worked fine. FOR THIS PROJECT I ONLY USED SIX and put them in relatively lightly if that makes sense.
I just screwed them chalkboard onto the back of the frame. One in each corner and one in the middle of each of the longer sides. If you have a drill it will make it a little quicker but it's still pretty easy with just a good ol' screwdriver! This is an image from the tutorial a few months ago and for the permanent chalkboard so I screwed them in a little tighter. For this one (which I forgot to take a picture of) I did it a little looser so they'd be easier to quickly take out and just tape on a new print and pop the back right back into the frame. I have done it now about 6 or 7 times and it's really quick and easy!
I just leaned mine up on my mirrored dresser but if you wanted to hang it you could always attach something so it could be hung!
And that's it!
I hope you all are having a lovely week!